
In part one of our introduction to food photography series, we covered the basics of lighting and composition when shooting in a restaurant, highlighting some of the key traps and a few tricks you can use when shooting in a challenging environment.
This second part will cover more extensive setups which can be used when taking food shots at home, as well some basics around staging and plating.
At first glance, taking food shots at home seems to be the easiest and most straightforward way to produce high-test food porn. You can fiddle endlessly with the dish and control lighting for consistent conditions, and time is not of the essence. After a few tries however, you will realize that food can be quite unforgiving when it comes to the perfect picture.
A staged photo invokes a different expectation than that from duress at a restaurant. A reference photo, like one in a cookbook is expected to be bright, colourful, full of contrast and clean. Any imperfection is greatly magnified, making lighting and composition even more important. An eye for detail is critical in ensuring that an emotion is evoked.
In the last of this three-part series, I will cover post production: what to do and how to perform basic image correct to make images stand out.
Food prep
Unless you happen to be a trained chef, you’ll start this entire process at a disadvantage. Understanding the basics of plating a dish is crucial to getting a great picture that evokes a response from your reader.
Start with a clean white plate. Think of this as a fresh canvas, the white will make colours stand out and provide a neutral context to work from. This will work for most pictures, as using a neutral, consistent background draws the eye to the food. Of course, you can experiment with plates of different patterns, colours, and textures, but it should always complement the type of food being served.
Whatever dish or bowl you choose to use, ensure that it is clean, and any smears or spots are wiped clean; the same way a chef would clean up a plate on the pass before sending it in a restaurant. Sloppiness will draw the eye away from the main subject and detract from the rest of the picture.
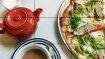
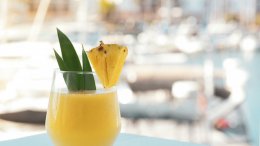
Most often, food tends to be placed directly in the middle of the plate. Like many modern plates, try plating the main component predominately to one side or just around the perimeter of the plate. This leaves much of the plate still open for accoutrements, like a cup of soup, slices of bread, or a place for a knife and fork. These supporting items, much like the supporting cast of a movie, can help set the context and tell a stronger story about the meal.
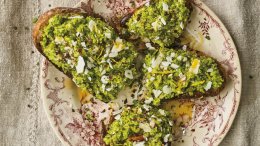
Monochromatic food has a tendency to look drab and uninteresting (think mushroom soup). In order to provide contrast, adding some complementary components: a dollop of cream half-stirred with a spoon on a beef stroganoff, a romaine lettuce leaf slipped under a fried fish, or a line of berry compote with swirls of chocolate sauce scratched with a toothpick.
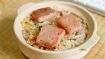
Most importantly, think about layers and plate upwards. If you look at many main courses, chefs will start at the bottom with a starch or something as a foundation of the dish. Then they’ll layer on some vegetables, the protein on top of that and then finally, the sauce and toppings. Showcasing food in all three dimensions (as discussed in Session one) helps create contrast between colours and a mental connection between flavours in the dish.
Props and composition
Once the plate showcases the food, it is the job of the other items in the shot to tell the story of the dish.
Small items like utensils, napkins, and wine glasses create the feeling of a dinner table. Beyond that, using a variety of related items can create a scene tells the story of where the food came from or how it was made.
A bowl of laksa noodles can be placed alongside stalks of lemongrass to allude to its ingredients. A thick steak can be placed on top of butcher paper with a cleaver wedged in a chopping block in the background to illustrate its freshness. A bowl of caponata and hunks of bread on top of a weathered wooden table with a bottle of wine can create a rustic Sicilian countryside feel.
Taking the time trapse through dollar stores or antique stores can yield interesting props. Plates, vintage knives, crystal jugs and decanters, wooden bowls and sometimes, vintages silverware, can create a unique picture.
Lighting and other details
The best option, if you haven’t invested in a good flash setup, is to shoot near a window (bay windows with translucent blinds are near perfect) and near the hours of sunrise or sunset. This will give you ample, soft light with minimal shadows.
As discussed in the first part of the series, the more light you can get to illuminate the scene, the lower an ISO can be used, which will help make colours more vibrant and details sharper, the two most critical factors items in food photography.
The most cost effective piece of light modification gear to invest in is a moderate sized 5-in-1 collapsible reflector. A properly angled reflector can held to redirect both sunlight and flashes into the shadows to create more even lighting in your scene. Use of the gold and silver sides slightly alter the colour temperatures, while the black and white sides help control stray light. The translucent fabric can help soften harsh direct light.
For many who are serious about creating perfectly lit pictures, a flash setup is required. Without a proper setup, avoid flashes. Flashes built into the camera or camera phone are often underpowered and placed too close to the axis of the lens, which is not ideal.
Off-camera lighting very quickly becomes a photographer’s best friend. Multiple off-camera lighting is extremely powerful, providing even and effective light in low light situations, removing shadows which obscure details and maintain accurate colour reproduction across the entire picture.
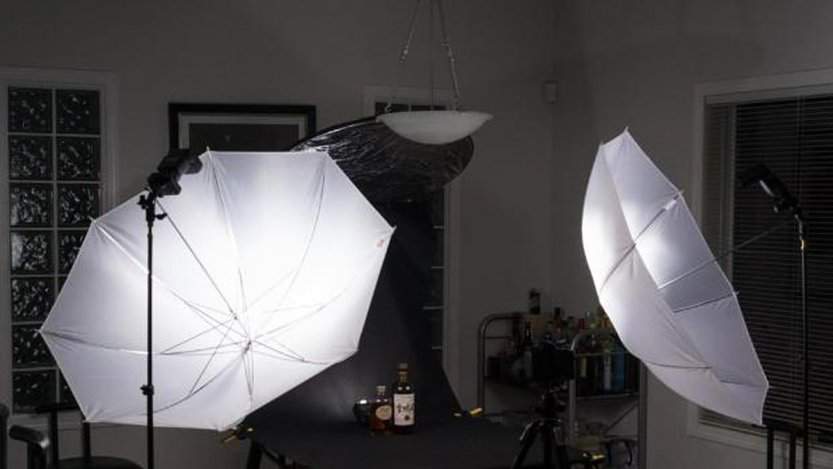
There is a significant amount of investment required for a comprehensive flash setup--a tripod, two to three flashes, wireless triggers, light stands, rechargeable batteries, and shoot through umbrellas--but the reward is consistent and highly detailed pictures.
When positioning flashes, position a two-flash setup from two different directions to eliminate shadows and provide an even light. Shooting with opposing flashes at 45 and 90 degrees to the plane of your camera lens, from a high angle aiming down, provide almost full flash coverage on the plate.
When shooting with flashes, having the camera in manual mode allows for complete control over the scene. Low ISO allows for the best colour reproduction as well as the most detail as possible. Shooting in full manual mode allows balance between control shutter, aperture, and flash power which allows you to fine tune the amiable the light, and overall light, and the ability to expose the lot areas respectively.
Just be sure to mind the maximum sync speed of your flashes. I tend to start with test shots at base settings of f/5.6 and 1/120s at ISO 100 with flash power somewhere around 1/32.
A stern word of warning about props: less is more. Although there is no definitive limit on the number of items, cluttering your frame with too many items, especially ones which have little or no relation to the story, detracts from the main focus of the picture.
I then adjust all the parameters independently to get the exact type of shot I want, using each of the factors to compensate for each other
The information provided so far has been a scant introduction to both flash lighting and plating. There are many general techniques which could be applied, but the best technique is to start shooting and find out the style of photos you like to shoot, and how to manipulate the light with the parameters on your camera to get what you want.